
This article is part of the Beginner Web Developer Series. The series is targeted to people who’d like to start serious web development, as well as people who are already web developers and want to solidify their knowledge of fundamentals while possibly filling in some holes. If you find yourself tinkering with HTML, CSS, or Javascript until you sort of get it to work, this series is for you. The material in this series is closely tied to my top-rated Coursera course.
In one of the previous articles called What is HTML, I mentioned that, technically, an HTML page is a tag-based document that follows a set of syntax rules.
In this article, I’ll show you how to code a very basic HTML document and then display it in the browser.
Just like a regular document, an HTML document has a structure. Unlike a regular document, a lot of its structure is mandated by the HTML Specification, as I discussed in the Who Controls HTML article.
The doctype Declaration
Every HTML document should start with a special line of code that declares its document type. The document type declaration, also known as the doctype for short, is illustrated below:
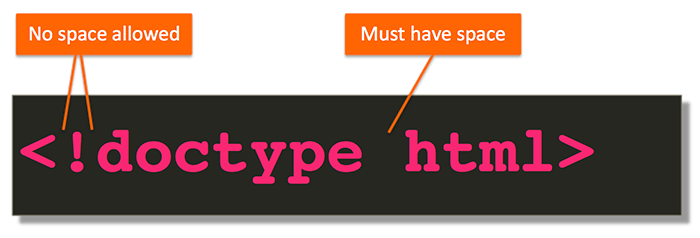
As you can see, the doctype tag is a slightly different looking tag from the ones we’ve discussed before. Immediately following the opening < is a !, followed by the word doctype, without any spaces in between.
While at least one space is required between the word doctype and html, as always, you can have as many spaces everywhere else in the tag. However, to make the code neat and readable, keep it the way it appears in the above illustration.
Note that the doctype declaration does not have a closing tag.
The case of any of the letters in the doctype declaration doesn’t matter either. You can even mix and match upper and lower case letters. For example, all of the doctype declarations below are valid and achieve the same outcome:
<!doctype html>
<!DOCTYPE HTML>
<!DocType Html>
<!DOctYPe hTmL>
If any of the above variations appeal to your aesthetic taste more, feel free to use that one. Although, if you prefer the last version, I suggest taking a nap first. Your eyes clearly need some rest! 😃
In the past, this declaration looked pretty complicated. Certainly, not too many people would be able to type them up without the use of copy/paste.
You want to see some of those? Here are a couple:
<!DOCTYPE HTML PUBLIC "-//W3C//DTD HTML 4.01//EN" "http://www.w3.org/TR/html4/strict.dtd"><!DOCTYPE html PUBLIC "-//W3C//DTD XHTML 1.0 Transitional//EN" "http://www.w3.org/TR/xhtml1/DTD/xhtml1-transitional.dtd">Oh, the horror! 😱
Anyway, modern HTML changed all that. Now, the declaration is as simple as it can be. All it does is tell the browser that it should get ready to render HTML.
What Else Would it Be If Not HTML?
Good question! Seems kind of strange to declare an HTML document… as an HTML document, doesn’t it?!
Yes, it does and that’s because this declaration is really largely historical.
When HTML standards were first becoming popular, the web was full of pages that were not compliant with the standards. To help browsers render those pages correctly, browsers used the doctype declaration to distinguish between non-compliant and compliant pages. Non-compliant pages were rendered in what’s called the quirks mode, and compliant pages were rendered in what’s called the standards mode.
That’s all historical. However, what you need to know today is that if you omit the HTML page declaration, that will signal to the browser that it should treat your page as one not following the HTML standard. The browser would render your page in quirks mode. That’s as quirky as it sounds! 😁
The layout of the page wouldn’t work quite right and the styles you apply would work a bit… well, quirky.
So, the bottom line is this:
Always use the simple HTML doctype declaration.
The html Element
Immediately following the doctype declaration is the <html> tag. The html element’s job is to be the container of all other elements within the HTML document and thus it is known as the root element.
The html element contains both parts of the document: the part visible to the user and the metadata about the document.
The head Element
Most of the metadata about the document goes inside of the head element. The term metadata literally means data about data. In our case, it’s the data about the HTML document.
This head section allows you to specify what CSS styles to use in the HTML document, the author’s description of the page, page title, what Javascript to execute, as well as different <meta> tags that specify things like what character encoding the document was written in.
I’ll tackle the meaning of character encoding in a different article. However, the general practice nowadays is to always use character encoding called utf-8.
So, to summarize so far, our HTML code would look something like this:
1
2
3
4
5
6
<!doctype html>
<html>
<head>
  <meta charset="utf-8">
</head>
</html>
Note that the meta tag is a standalone tag. There is no closing tag.
The title Element
The head section of our document is still invalid. While declaring the character encoding is a good idea, it’s not required. What is required, however, is for the head element to contain the title element. Without the title element present, the page is invalid.
Let’s add the title element in:
1
2
3
4
5
6
7
<!doctype html>
<html>
<head>
  <meta charset="utf-8">
  <title>It's a title... wave!</title>
</head>
</html>
The body Element
The <body> tag is the root of all content that is visible to the user. It is often referred to as the viewport.
No other tags are allowed between the closing </body> tag and the closing </html> tag. That means the closing </body> tag should be immediately followed by the closing </html> tag. As usual, spaces aren’t really considered content, so you can position the closing </html> tag on a new line and space it out however looks more readable to you.
Let’s put all this together into a full (yet simple) HTML page:
1
2
3
4
5
6
7
8
9
10
<!doctype html>
<html>
<head>
  <meta charset="utf-8">
  <title>It's a title... wave!</title>
</head>
<body>
  Content is KING!
</body>
</html>
Save this file as simple-document.html, remembering which directory you saved it in.
Once done, open up your browser, e.g., Google Chrome. Click on the File menu and select Open File.... Navigate to the directory where you saved simple-document.html and choose it, clicking the Open button. You should see something like the following:
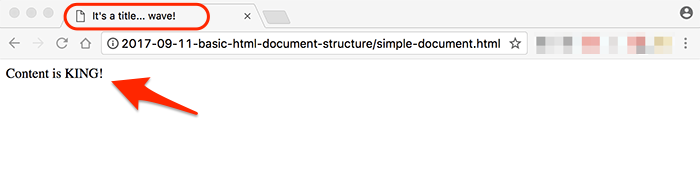
As you can see, the text I placed inside of the <title> tag is showing (circled in red) as the name of the browser tab. The viewport of the browser, i.e., the part visible to us, shows the text which was surrounded by the <body> tag.
But Is It Valid?
Let’s use an online HTML validator, recommended by the WHATWG, to validate our HTML code.
- Go to the following link: https://html5.validator.nu/
- From the drop down that says Address, choose Text Field
- Erase everything in the text area
- Copy and paste the HTML code of the
simple-document.htmlfile into that text area and then click theValidatebutton.
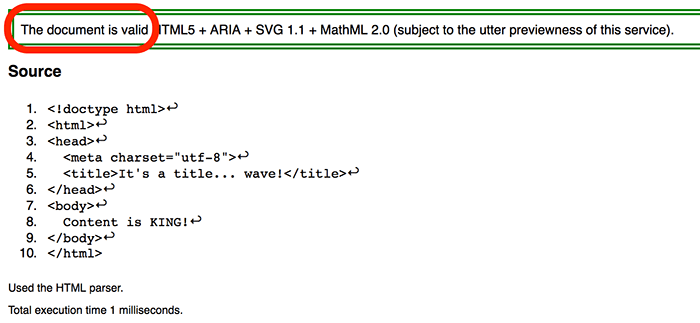
As you can see from the screenshot below, the validator reports our HTML code as valid:
Let’s Break it and Fix it
When I discussed how tags can be nested, I mentioned the tag rule of closing first what you opened last.
Let’s sprinkle some simple tags into our body content, but break that rule in the process (invalid-document.html):
1
2
3
4
5
6
7
8
9
10
<!doctype html>
<html>
<head>
  <meta charset="utf-8">
  <title>It's a title... wave!</title>
</head>
<body>
  <p>Content is <span>KING</p></span>!
</body>
</html>
Notice that the closing </p> and </span> tags are in the wrong order.
Copy this code into the validator, following the steps outlined above and click the Validate button again. Here is the outcome:
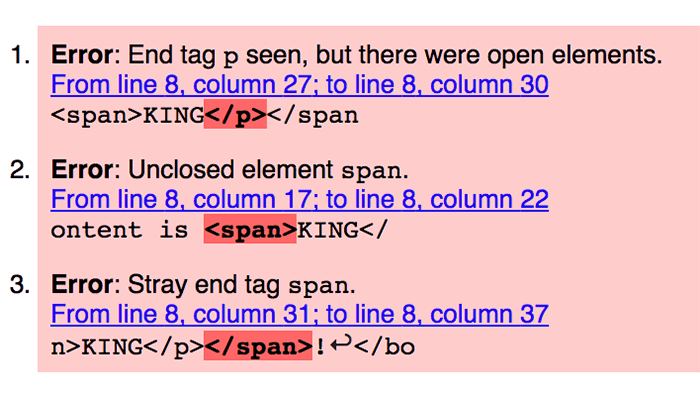
Read through those messages. Clearly, the browser would be confused by our code.
The fix is simple: swap the closing </p> and </span> tags (fixed-invalid-document.html):
1
2
3
4
5
6
7
8
9
10
<!doctype html>
<html>
<head>
  <meta charset="utf-8">
  <title>It's a title... wave!</title>
</head>
<body>
  <p>Content is <span>KING</span></p>!
</body>
</html>
Following the validation process again shows that the fixed HTML code is valid!
The world makes sense again! 😎
Summary
Let’s give a quick summary of what we’ve covered in this article:
- Each HTML document should start with the simple
doctypedeclaration - Leaving out the
doctypedeclaration causes the browser to treat the HTML code in quirks mode, which breaks standard behavior - The
<html>tag is the root of the document that contains all other tags - The
<head>tag contains the metadata about the document - The only required metadata element is the
titleelement - The
<body>tag (or viewport) is the root of all content visible to the user - Use an HTML validator recommended by WHATWG to make sure the HTML code is valid
Resources
Questions?
If something is not clear about what I wrote in this article, please ask away in the comments below!